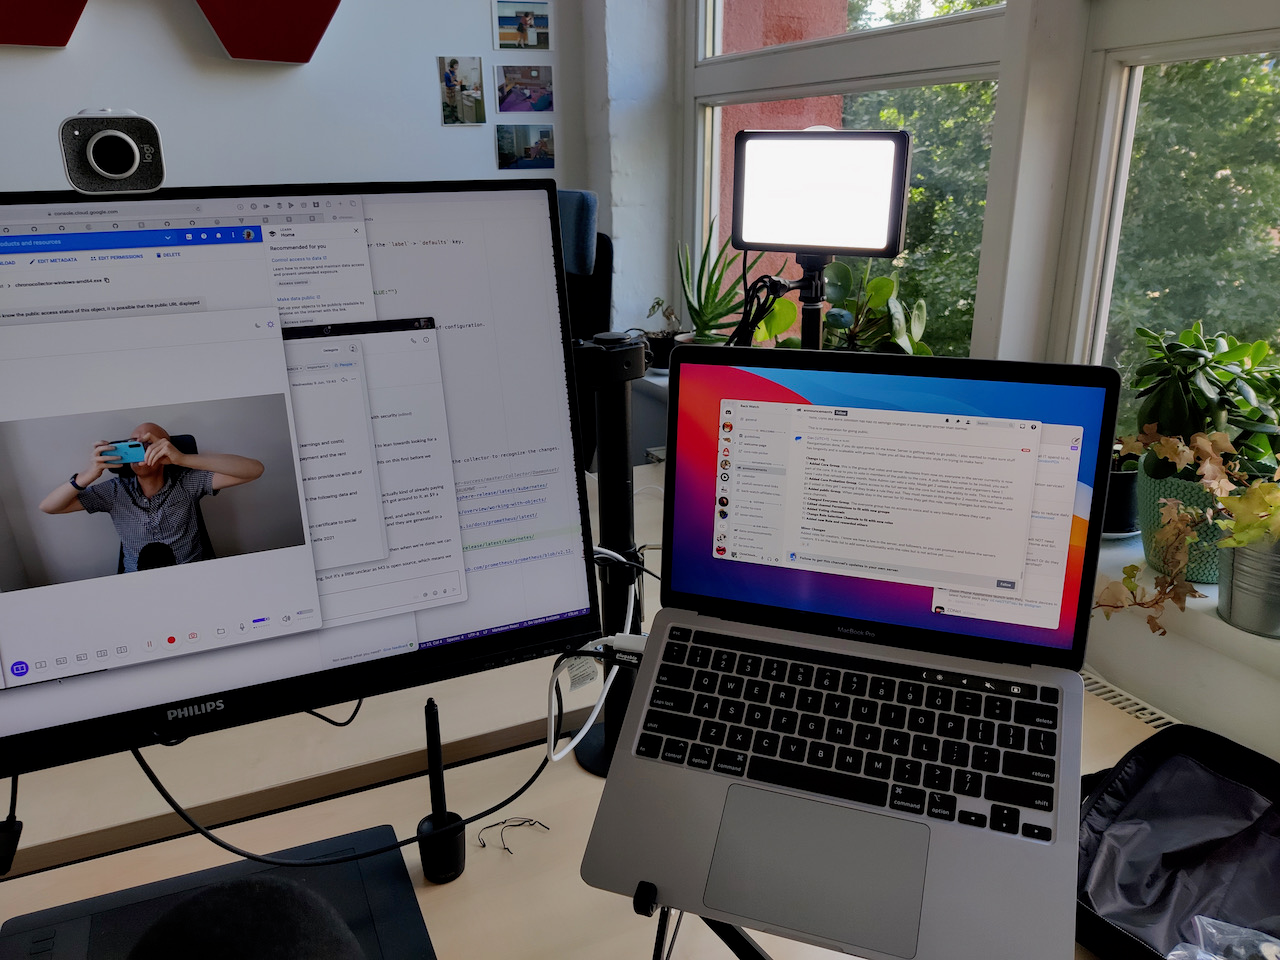
My audio and video production setup 2021

I’ve been running podcasts for years, and while I worked on some video courses in the past, over the past year I have invested more time in my audio and video setup, primarily for live-streaming. After months and months of getting It to a point where I am “kind of” happy with it, I thought it was high time I documented it. Partly so others can learn from my setup, and partly so I can keep tabs on it myself.
Disclaimer
I spend a lot of time on making videos, and some of the product links here are affiliate links to cover even some of the time and money I have invested. If you don’t like affiliate links, but would still like to say thanks, subscribe to my YouTube or Twitch channel, or find other ways to support me on my website.
A vs B setup
I am lucky enough to have my own small office/studio, and naturally this is where I do most of my work. But I also need to sometimes do work at home (often interviews with people in the USA), where it’s too late to be in the office, and I’d rather do it home. I have conducted interviews travelling before, and while I’m doing less right now, it’s still like to have the option(s) available.
I call these my “A” and “B” setups. Or the setup that largely stays fixed in the office (A), and the setup that I use at home, or travelling (B). There are some overlaps, but primarily with software.
Audio
The audio part is somewhat easier, and has been mostly the same hardware for a while, but configured in different ways.
A setup
{% picture article images/IMG_20210827_103429.jpeg alt=“A Blue Yeti mic” %}
{% picture article images/IMG_20210827_103456.jpeg alt=“Boom arm” %}
A Blue Yeti, with a foam wind/pop filter. It’s mounted on a boom arm most of the time, but I do also have a straight mic stand with a Justin (home brand of “Just Music”, a German music store) reflection filter for more precise pure audio recording to counter the echoing high ceilings of many Berlin rooms.
{% picture article images/IMG_20210827_103526.jpeg alt=“Reflection filter” %}
B setup
{% picture article images/IMG_20210830_071150.jpeg alt=“Exjoy camera mic combo” %}
Depending on my mood I sometimes use an iRig HD 2 mounted on a pretty crumby boom arm if I am not using an external camera, or this odd phone holder (more on that later) mic stand combo thing from Exjoy. My other mic option is a lav mic from iRig. It’s analogue, so needs a headphone jack, and curiously also needs headphones plugged into its connector, so even though I am often using it with my OnePlus buds for calls, I typically have an audio cable also plugged into it, basically doing nothing.
Software
{% picture article images/audition.jpg alt=“Adobe Audition” %}
For recording (and editing) just me and a mic, I generally use Adobe Audition, I have been experimenting with demos of Ableton and Logic, but not committed to either yet. For recording a mic plus an application or VoIP call, I pretty much always use Audio Hijack, it’s a classic macOS app for a reason. In fact I have something of a chain of Rogue Amoeba software I use for audio and video, including Farrago (SFX) and Loopback (audio routing). I know there are open source and free equivalents for both, but especially with Loopback, I found its flexibility and ease of use worth the money. I don’t really use any effects on input aside from some volume overrides, but probably should.
{% picture article images/ra-apps.jpg alt=“Farrago, Audio Hijack, and Loopback from Rogue Amoeba” %}
Video
Ok, this is where things get a bit more complex unsurprisingly. I mix up hardware and software for some obvious reasons, as there’s some software each camera needs, and then there’s software I use no matter what.
A setup
{% picture article images/IMG_20210827_105508.jpeg alt=“Logitech Streamcam” %}
{% picture article images/IMG_20210827_105526.jpeg alt=“UTEBIT magic arm” %}
A Logitech Streamcam. I am still not sure if it’s worth the extra over the classic Logitech C922, but there you go, I have it now. It’s mounted on a UTEBIT magic arm sort of behind my monitor, but I am not completely happy with the placement, as it makes me look a bit too far away. I have tried it in various positions with the same lack of satisfaction, it’s hard to balance the whole “good camera shot” with being able to see your screen, and I am not there yet. I mostly use the camera it as a straight input into an application, but I am starting to experiment more with using the supplied Logi Capture software for more fine-grained camera control, and then routing that into an application.
{% picture article images/lsc.jpeg alt=“Logi Capture” %}
B setup
{% picture article images/iriun.jpeg alt=“Iriun Camera” %}
Naturally at times when I am just having a call that I use the camera built into my laptop, but for recording and streams I actually use my phone camera. Uh huh, my phone camera. The phone is kind of the least relevant part as any modern phone camera is decent, but my current is a One Plus Nord. The in-built camera software does do a lot of annoying auto focusing that can sometimes make my video have this odd kind of “wishy washy” look, but most people don’t notice it. I actually much preferred using my old Essential phone, as the camera software did next to nothing. Ironically everyone complained about the camera software on that phone, and this made it a perfect external camera. There are plethora applications now that let you use a smart phone as an external camera, but mine of choice are DroidCam OBS (if only recording with OBS) and Iriun for pretty much everything else. I was suitably impressed with both, to pay for the full versions. Iriun is one of those “Virtual Camera” applications, which means on macOS, you sometimes need to jump through the unsigning hoop to get it to work in some applications.
Software
OK, this is where it gets complicated. Let’s add more subheadings…
Livestreaming
{% picture article images/obs.jpeg alt=“Open Broadcast Studio” %}
{% picture article images/restream.jpeg alt=“Restream Studio” %}
When it’s just me, Open Broadcast Studio (OBS), I think I could write a separate post on my OBS setup, so that’s all I’ll say for now 😅. If I have guests then Restream studio, which is web-based. I am not a huge fan of doing things in the browser, but it’s simple for others to join, and gives me enough flexibility for setup, quality, and graphics. I also use it deliver my livestreams (via an RMTP feed) when I use OBS, so it’s multipurpose. It’s not cheap, but worth it, and they often have discount codes.
Recording
I vary between Quicktime, Snagit, Logi Capture, and OBS, depending if I want to record a camera, or record multiple cameras, or record camera plus screen share. And quite often depending on the quality I want to record and my mood. I am not entirely satisfied with the video quality of any of these options sometimes, and I am never entirely sure if it’s the camera or the software.
Editing
{% picture article images/premiere.jpeg alt=“Adobe Premiere” %}
Mostly Adobe Premiere, but sometimes Quicktime or Snagit for something simple. I have tried Da Vinci Resolve, but I couldn’t get on with it, I am too used to Premiere.
Lighting
{% picture article images/IMG_20210828_122608.jpeg alt=“Neweer LED lights” %}
I know lighting is important, and I am late to that party, muddling through for some time. I acquired some cheap office clearance photography lights last year which resulted in reasonable lighting but took up too much space, and annoyed my office mates. I switched to a set of the Neweer LED desk lamps. I am still getting the setup quite right, and I am especially unhappy with the shadows they throw behind me. I know the techniques to fix this, but I am trying to balance space and convenience with quality 😉. I often add slight bit of warmth to lighting by also just switching on my Ikea Symfonisk desk lamp.
One of my biggest issues with lighting in the office is that we have a giant window that looks out over Berlins Spree river. It’s a wonderful view, but terrible for consistent lighting, especially as the sun can reflect off the water, and trains passing the nearby railway tracks.
Other
Screen annotation and highlighting
To highlight what I am doing on the screen, I use a handful of different apps and setups.
At simplest I increase the zoom level of windows to about 125-150% depending on how they look. This is generally only possible with browser windows or Electron-based applications (which I typically dislike, but in this case brings a positive). With other applications it can be a mix of using the macOS screen zoom, or just not having a very readable interface. Fortunately the main applications I show are browser windows, Visual Studio Code (Electron-based), and iTerm, which is highly customisable, and I have a profile specifically designed for live-streaming (I should release that 🤔) that increases font size, removes background transparency, and makes things clearer for people to read.
{% picture article images/presentify.jpeg alt=“Presentify” %}
I use a small application called “Presentify” to highlight my cursor, and to annotate the screen (which I do rarely, but it’s nice to have both in the same application).
{% picture article images/keycastr.jpeg alt=“Keycastr” %}
I occasionally use another small application called “KeyCastr” to show the keyboard shortcuts I’m using, but that’s something I use more when recording tutorial videos.
Control
{% picture article images/IMG_20210625_143818.jpeg alt=“Streamdeck Mini” %}
I have a Streamdeck mini with a bunch of useful shortcuts for OBS, or whatever other application I’m using setup so I can trigger changes without having to use the mouse. If you don’t want to invest in hardware, they also have a pretty good mobile application to do the same.
That’s a wrap!
That’s about it for hardware, software, and tools. Making, editing, and distributing videos, podcasts, and livestreams is a whole other discussion that I am not even sure I could put into blog post form, but maybe one day. I’ve mentioned in places throughout this post what I’d like to change and tweak about my setup, so I plan to revisit and keep this post updated as I do so.
I hope you found this useful and I’d love to hear your comments and setup tips in the comments.
If you like what you're reading, support my work

Grapple git without the grief and try Tower, the best graphical interface for git on macOS and Windows.
Try Tower for freeStart learning something new or up-skilling with a book or course.
30% off ANYTHING at Manning